3. Installing and Configuring SQL Server Reporting Services 2008
The installation
and configuration of Reporting Services 2008 in SharePoint Integrated
mode can be accomplished by creating a new reporting database that runs
in SharePoint Integrated mode. The following steps must be followed to
install Reporting Services in SharePoint Integrated mode.
Install a SharePoint 2010 instance. Install
SQL Server 2008 R2 Reporting Services. SQL Server Reporting Server 2008
R2 can be installed with the installation of SQL Server 2008 R2, as a
SQL server component, or as a stand-alone component. Configure
Reporting Services using the Reporting Services Configuration Manager. Download and install the SQL Server 2008 R2 Reporting Services Add-in for SharePoint 2010, which can be found at http://www.microsoft.com/downloads/details.aspx?FamilyID=16bb10f9-3acc-4551-bacc-bdd266da1d45&displaylang=en.
This add-in needs to be installed on a single WFE (even when your farm
has more) and is necessary for the integration with SharePoint 2010.
After installing the add-in and configuring Reporting Services, you will
be able to publish Reporting Services content to a SharePoint site.
This add-in contains the following items.
3.1. Configuring Reporting Services
After you install Reporting Services, you must configure Reporting Services, which you can do using the following procedure.
Launch
the Reporting Services Configuration Manager by selecting Configuration
Tools from the SQL Server 2008 R2 menu. The Reporting Services
Configuration Connection dialog box that opens is shown in Figure 10.
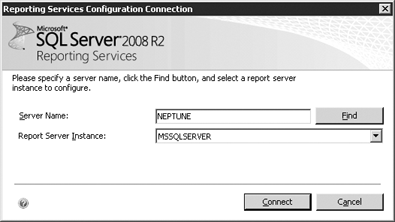
Specify
the correct name in the Server Name text box and click Connect. The
Reporting Services Configuration Manager opens, as shown in Figure 11.
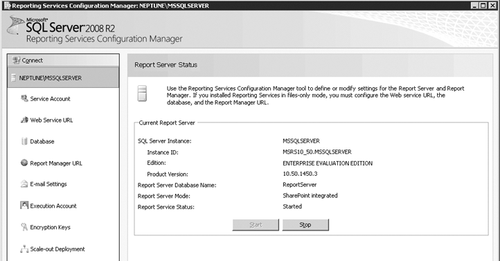
Click the Database tab, shown in Figure 12, to reveal the Report Server Databases screen.
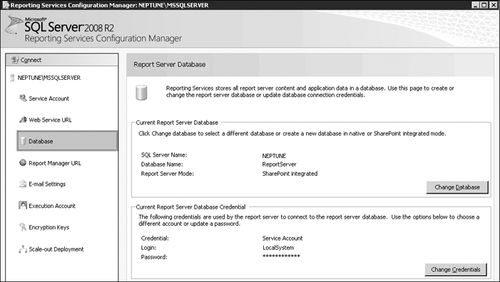
Click
Change Database to create a new database in SharePoint Integrated mode.
This opens the Report Server Database Configuration Wizard, as shown in
Figure 13.
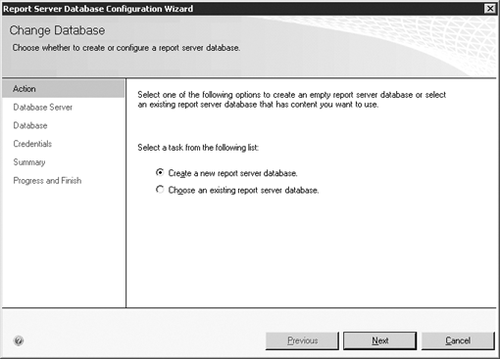
Select
the Create A New Report Server Database option and click Next. The next
step of the wizard is the Database Server step, as shown in Figure 14.
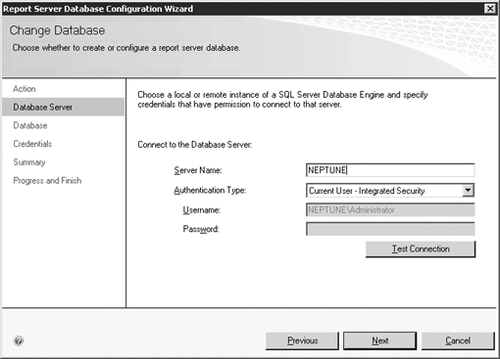
Make
sure that the name in the Server Name text box is correct and select
the correct entry from the Authentication Type drop-down list. There are
two options here, Current User – Integrated Security or SQL Server
Account. In the latter case, you must provide a valid user name and
password. Click Test Connection to test the connection to the database
server. Click Next if the connection succeeds; this will take you to the
Database step in the wizard, as shown in Figure 15. If the connection test is unsuccessful, you’ll need to troubleshoot connectivity to the server.
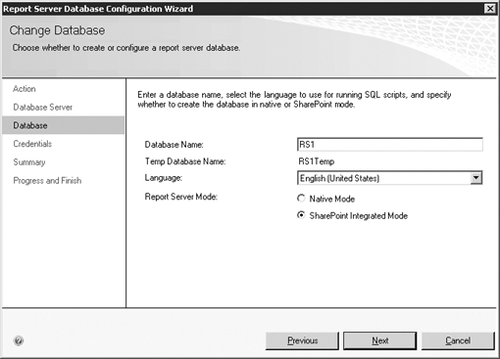
Specify
the correct name in the Database Name text box and select an option in
the Language drop-down list for the language you want to use for running
SQL scripts. Make sure you select the SharePoint Integrated Mode option
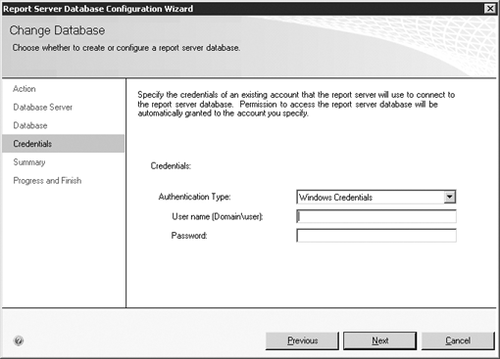
and click Next. The
next step is to specify the credentials that the report server will use
to connect to the report server database. There are three
authentication types you can choose from: Windows Credentials, SQL
Server Credentials, or Service Credentials, as shown in Figure 16.
If you have a least-privileged domain user account that has permission
to log on to the computer and has access to the database, you should
choose Windows Credentials. If you don’t have that, you can choose
Service Credentials to connect using the Report Server account itself.
This way, the server connects using integrated security so credentials
are not encrypted or stored, although the Report Server account
typically doesn’t qualify as a least-privileged account. Finally, you
can opt to use SQL Server Credentials, in which case a connection is
made using a SQL Server login account. This last option is ideal in
situations where Report Server is located on a server in a different,
non-trusted domain or on a server that is located behind a firewall.
Make a selection and click Next.
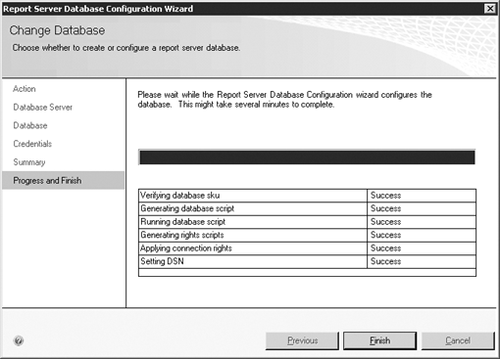
The wizard presents an overview of the configuration and the status of the configuration, as shown in Figure 17. When the status bar indicates that the configuration is complete, click Finish.
3.2. Configuring Report Server Integration with SharePoint Central Administration
After running the
Reporting Services Configuration Manager, the next step is to configure
the report server integration in SharePoint Central Administration,
using the following procedure.
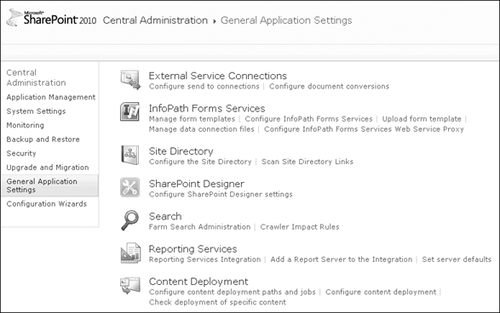
Launch the SharePoint 2010 Central Administration website. Click
the General Application Settings tab. There should be a Reporting
Services section available. (If you don’t see it, you have not yet
successfully installed the Reporting Services Add-in.) The Reporting
Services section contains the following links, which you can see in Figure 18.
Click the Reporting Services Integration link. This opens the Reporting Services Integration page, as shown in Figure 19.
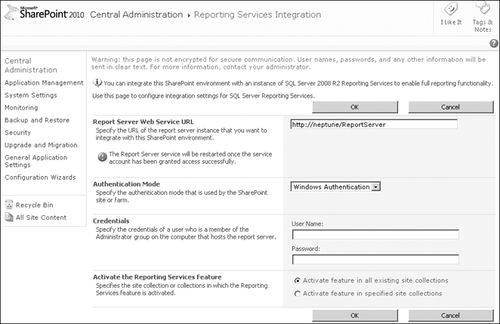
In the Report Server
Web Service URL section, specify the report server Web service that you
want to use with SharePoint. This URL can be found in the Reporting
Services Configuration Manager at the Web Service URL tab. In
the Authentication Mode section, select either Windows Authentication
or Trusted Account as the authentication mode of choice. If you choose
Trusted Account mode, SharePoint sends an additional header with a
security token representing the identity of the SharePoint user that is
currently interacting with Reporting Services application pages to the
report server. SharePoint sends this request under the identity of the
trusted account. The report server then impersonates the SharePoint user
and checks if this user is allowed to access a report server item or
perform a report server operation. In other words, the trusted account
itself doesn’t need to have access to any report items and operations.
On the other hand, if you choose Windows Authentication, you must also
enable Kerberos. In that case, any SharePoint calls made to the report
server are sent under the Windows identity of the current SharePoint
user. This account must have permission to access the report server as
well as report items and operations. If a SharePoint Web application is
configured for Forms authentication, the Authentication Mode setting is
ignored and the request header will always contain a security token for
the impersonated account of the SharePoint user. In the Credentials section, specify the user credentials that are used to connect with the report server. In
the Activate The Reporting Services Feature section, specify the site
collection or site collections in which the Reporting Services feature
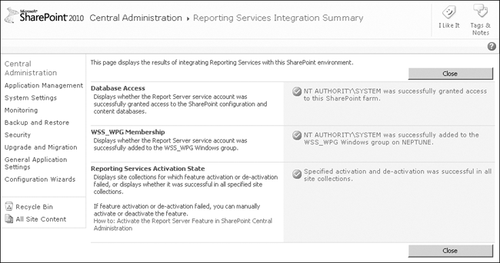
is activated. Click OK. The next page contains the results of integrating Reporting Services with SharePoint, as shown in Figure 20.
The number of entries may differ if the account you are adding already
has access to the SharePoint farm or already is a member of the WSS_WPG
group.
Click the Add A Report Server To The Integration link. This opens the Reporting Services Integration page, which you can see in Figure 21.
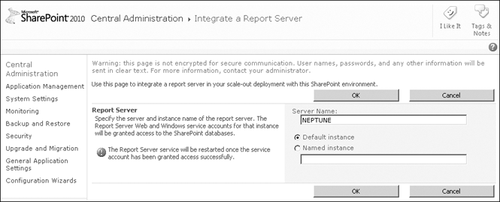
In the Report Server section, specify the server name of the report server. Click
OK. A Web Page dialog box opens, where you must specify the credentials
for retrieving the Reporting Services service accounts. Click the Set Server Defaults link. This opens the Reporting Services Server Defaults page, as shown in Figure 22.
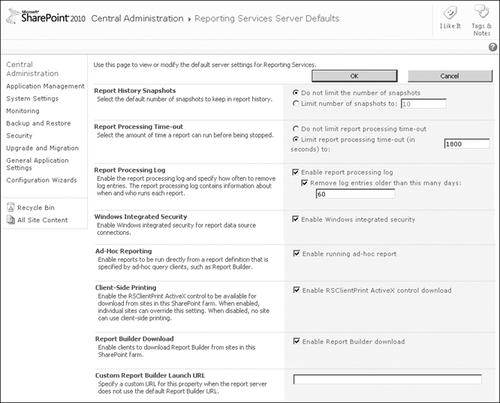
In the
Report History Snapshots section, you can specify the number of default
snapshots. This will be the number of copies of report history that will
be retained. In the Report Processing Time-out section, specify the number of seconds a report can run before it times out. In
the Report Processing Log section, you can enable the report processing
log and specify how often to remove old log files. The log files are
stored in the \Microsoft SQL Server\MSSQL.n\ReportServer\Log folder.
Each time the service is restarted, a new log file is created. In
the Windows Integrated Security section, you can enable Windows
integrated security for report data source connections. If you choose to
do so, Reporting Services uses Windows integrated authentication mode
to access data sources. In the Add-Hoc Reporting section, you can enable the creation of customized reports using Report Builder. In
the Client-Side Printing section, you can enable the download of the
RSClientPrint ActiveX control, which contains printing options to print
reports that are available in SharePoint. In
the Report Builder Download section, you can enable the download of
Report Builder so that users can download Report Builder to make
customized reports. In
the Custom Report Builder Launch URL section, you can specify a custom
URL for the launch of Report Builder. If you specify a custom URL, the
default Report Builder URL will not be used to launch Report Builder.
The report server is now installed and configured in SharePoint Integrated mode.
4. Deploying and Managing Reports
This section provides a discussion of
the deployment of reports from an existing to a new SharePoint
environment, which is as easy as uploading a report to a list in a new
SharePoint environment and then updating its data source reference. The
following procedure explains how to deploy a report to another
SharePoint server.
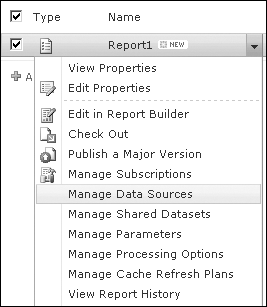
Go to the SharePoint site that contains the report and the data source that you want to move. On the site, find the library where you report files are stored and select the report file that you want to move. In the Copies group, select Download A Copy. Repeat steps 2 and 3 for the report data source file. Go to the SharePoint site where you want to place your report. Upload the report in the destination library. Upload the report data source file in the destination library. Change the data source that is specified in the report. Go to the library where the report is located, click the action menu, and select Manage Data Sources, as shown in Figure 23.
Click
the name of the data source. This opens a page where you can specify
the connection type and the data source link, as shown in Figure 24. Here you can edit the data source link. Click OK when you are finished.

To
edit the data source definition, go to the library where the report
data source file is located and click the action menu of the report data
source file you want to edit. Select Edit Data Source Definition. This
opens a page that allows you to specify the connection string you want
to use, as well as the credentials used to access the data source. Click
OK when you’ve finished selecting the appropriate options.
|